DIY Upcycled Hanukkah Menorah with Video
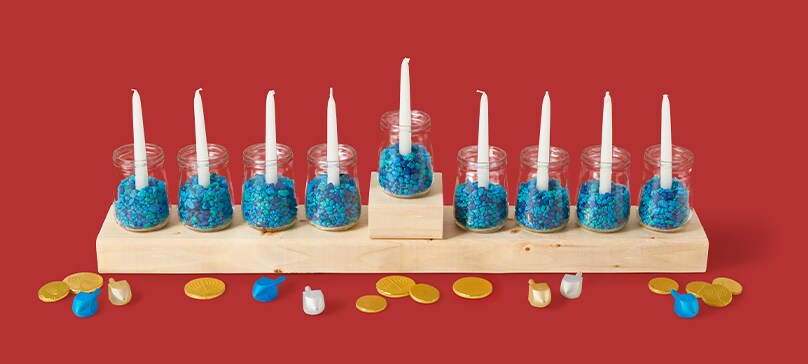
A beautiful menorah can bring light and meaning to any Hanukkah celebration, no matter the style. This DIY upcycled menorah is made with recycled jars, blue glass stones and a wooden plank and block. Though it may not be entirely traditional, it makes a wonderful centerpiece for any table or mantel, and it’s easy enough to craft that the kids can help make it.
What is the Symbolism of a Menorah?
The story of Hanukkah begins around 200 B.C.E., when a group of Jews called the Maccabees overthrew a foreign occupation and reclaimed their city’s holy Second Temple. Right away, they rebuilt the temple’s altar and lit the menorah, which represented knowledge and creation, and shone as a symbol of hope. However, they only had enough oil to keep the menorah lit for one day, and it would take at least eight days to get more. But in that time a miracle occurred: The menorah burned for all eight days on a single day’s worth of oil.
Today, the light of the menorah recalls the victory of the Maccabees over their oppressors and also serves as a reminder of the miracle of the oil. However, it also symbolizes broader ideas like the triumph of light over evil, and it shows that even a small amount of good can overcome great darkness.
How Many Candles Are on a Menorah?
Menorahs originally only had seven candles. However, a Hanukkah menorah, which is technically called a hanukkiah, has nine candles. Eight of the candles represent the eight days that the menorah burned. The middle candle, the shamash, is used to light the other eight candles and symbolizes God’s helping hand.
How to Make Your Own Hanukkah Menorah
Making your own menorah is actually simpler than it may seem! Plus, this combination of recycled jars, decorative glass and a wooden display uses common items that you likely already have around your home. Here’s what you’ll need:
- 9 small glass jars
- 4-6 cups blue decorative stones
- 9 small Hanukkah candles
- 1 wooden plank (you can use your preferred size as long as all 9 jars can be placed comfortably along the board)
- 1 wooden block, about the size of 1 jar (this will be used to raise the shamash)
Step 1
First, thoroughly clean each jar and remove any labels. If the labels are difficult to peel off, you can soak them in warm, soapy water for 20 minutes to help loosen the adhesive. Dry completely.
Step 2
Once the jars are ready, fill each one with decorative stones to about 3⁄4 full. Aquarium rocks or decorative glass stones work well. These directions call for blue stones since blue is traditionally a Hanukkah color, but you can use silver, white, your favorite color or a combination of several colors.
Step 3
Set a Hanukkah candle in each jar, making sure to bury them in the stones so that they’re firmly anchored and won’t move when lit.
Step 4
Place the wooden block in the center of the longer board. Set your shamash on the wooden block, then arrange the remaining eight candles along the board with four on either side of the shamash.
Step 5
Display your new menorah in a large window or on a table or mantel. Decorate with scattered gold chocolate coins or add more Hanukkah decorations. Light the menorah and celebrate the Festival of Lights!
We’re getting ready to celebrate the Festival of Lights with recipes and decoration ideas for your gathering. To see more holiday inspiration, visit our Hanukkah Shop.
Upcycled Hanukkah Menorah
Save and reuse glass jars for this festive activity! Follow the steps for this easy craft to create your own Hanukkah décor.

