Week 5: Natural Tie Dye
Do you know why babies wear bibs? Because of food stains! Luckily, most of those spills and drips can be removed with a little soap and water because they haven’t been “set” with something called a mordant, which is what you need to make color truly stick to fabric. For this activity, you’re going to use common ingredients and foods in your kitchen to create a rainbow tie dye shirt or pillowcase. But first, here’s what you need to know to make sure your fabric rainbow shines on after the next rain storm (AKA spin cycle!).
1. Pick the right fabric.
Natural fabrics like finer woven muslin cotton or knit cotton accept natural dyes best. Pick a plain white T-shirt or pillow case to let the colors really shine.
2. Treat your fabric with a mordant.
To make sure your natural dyes don’t wash right out the next time you throw your rainbow masterpiece in the washing machine, you need to treat your fabric with a mordant, or fixative, that prepares the fabric to accept the dyes. For veggie/plant colors (all the colors we’re making here), make a vinegar fixative. Pour 2 cups vinegar into 8 cups water; bring to a boil, then reduce to a simmer, stir in your fabric and let it brew for one hour. If you’re experimenting with fruit-based dyes, you’ll want a salt fixative. Stir ½ cup salt into 8 cups water; bring to a boil, then reduce to a simmer and toss in your fabric for one hour. Remove the fabric and rinse in cold water — it’s ready to dye!
3. Play with color.
Obviously, a true rainbow has seven different colors, but that’s a lot when you’re making your own dyes. We’re going to focus on four colors — but that doesn’t mean you have to stop there! You can boil onion skins to make orange, or blueberries to make a shade of blue. We picked red (which ends up closer to pink), yellow, green and purple because they’re some of the brighter, more vibrant colors you can make with foods. Native Americans have a long history of creating fabrics with very bright, colorful and natural dyes, but most of those are made from foraged plants and herbs that might be hard to find — things like mountain alder, bloodroot, smooth sumac and black walnut. To keep things simple and fun, we’re using foods you can buy in our store and may already have at home. However, they may not turn out as bright as synthetic dyes or the natural dyes you can make from foraged barks, plants, herbs and bugs like cochineals (which, by the way, are often used to dye your favorite strawberry-flavored popsicles and yogurts!).
4. Try mixing primary colors.
You can actually make all the colors of the rainbow using just the three primary colors: red, yellow and blue. Set aside smaller amounts of the colors you make to mix with each other, if you like. To make orange, mix red + yellow. For green, mix blue + yellow. And for purple, mix blue + red.
5. Learn about color compounds.
So what gives these foods their dyeing superpower? If you could look at them at the molecular level, you’d see the distinct compounds responsible for the shades they create. Reds, blues and purples come from a compound called carotenoids, for example. If you’ve learned about how plants turn sunlight into energy, you’ve probably heard of chlorophyll, which is what gives green leaves (like spinach) their color. If you’re talking deep purple and blue, you’re seeing the work of a compound called anthocyanin.
What You'll Need:
- Water
- 4 large stainless steel or aluminum stockpots (natural dyes may stain ceramic)
- Large glass bowls or jars
- 6 bags hibiscus tea (for pink/red dye)
- ¼ cup turmeric (for yellow dye)
- 4 cups spinach (for green dye)
- Blender
- 2 Tbsp. salt
- Strainer
- 1 head red cabbage (for purple dye)
- Funnel for pouring liquids
- 4 condiment squeeze bottles
- White cotton T-shirt or pillow case
- 8 cups vinegar, divided
- Old rimmed baking sheet
- Rubber bands
- Drop cloth, newspapers, or other protective barrier
- Rubber gloves
What You'll Do:
1. Kids + Adults: To make pink/red dye, bring 3 cups water to a boil. Turn off heat and carefully pour water into glass bowl or jar. Add 6 bags hibiscus tea to water. Cover and let steep 1 hour; remove tea bags.
2. Kids + Adults: To make yellow dye, bring 2 cups water to a boil. Add turmeric and stir until dissolved. Remove from heat and carefully transfer to glass bowl or jar.
3. Kids + Adults: To make green dye, bring 2 cups water to a boil. Add spinach to blender and carefully pour in water. Cover and blend until smooth. Let sit 1 hour, then stir in 2 Tbsp. salt. Strain liquid into a large glass bowl or jar.
4. Kids + Adults: To make purple dye, roughly chop cabbage. Meanwhile, bring 4 cups water to a boil, then reduce to a simmer. Add cabbage and simmer 1 hour. Strain liquid into large glass bowl or jar.
5. Kids + Adults: Using a funnel to avoid spilling, carefully pour dyes into squeeze bottles.
6. Kids + Adults: Make a vinegar fixative, or mordant, by pouring 2 cups vinegar into 8 cups water. Simmer fabric item(s) in vinegar-water solution 1 hour. Carefully remove from water, and keep wet. Allow it to cool.
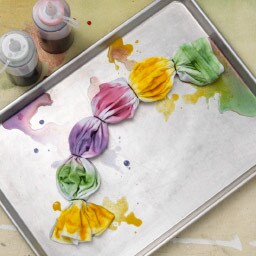
7. Kids + Adults: When fabric is cool enough to handle, wring it out and lay it on rimmed baking sheet. Carefully crinkle it up, accordion-fold style on the diagonal, until the material is gathered in one straight “line.” At regular intervals, secure fabric with rubber bands.
8. Kids + Adults: Lay down a protective barrier. Put on rubber gloves. Working over baking sheet, carefully squirt dyes in the order you like onto the scrunched up fabric, keeping a single color of dye between 2 rubber bands. Make sure you apply as much dye as possible turning it around to get all sides. Let it sit about 1 hour.
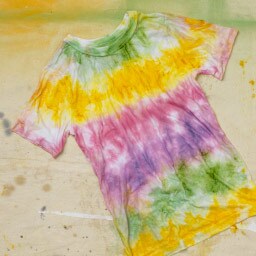
9. Kids: Rinse fabric under cold water. Remove rubber bands and hang to dry. Wear the rainbow!


